
How to Seal Mylar Bags: Tools, Temperatures, and the Checks Nobody Teaches
Every prepper forum has the same quiet horror story: someone opens a mylar bag after five years and finds the rice inside is dead. Faded. Stale. Spoiled. The bag looked sealed. It was sealed. It just wasn’t sealed well. Learning how to seal mylar bags is only half the job; learning how to know your seal will hold is the half almost nobody teaches. This guide covers both. First the tools, the temperatures, and the step-by-step routine, then the verification checks that let you walk away with confidence instead of hope.
Why Heat-Sealing Is the Only Seal That Counts
A mylar bag is a three-layer sandwich: a polyester outer skin, an aluminum foil core, and a polyethylene (PE) inner lining. When you heat-seal the bag, you are not melting the “mylar” at all. You are melting the PE inner layer against itself. The foil layer never fuses; it just sits there doing its real job, which is blocking light, oxygen, and moisture from passing through the film.
That single fact explains most of the confusion around sealing. A zipper is convenience, not a barrier: the zipper track has gas-permeable seams, and plastic itself slowly breathes. For anything stored longer than a few months, close the zipper and heat seal the bag above it. You do not need a vacuum, either. Oxygen is only about 21% of air. A sealed mylar bag plus an oxygen absorber removes the part of the air that spoils food; the leftover nitrogen stays harmlessly in the bag. Many people try to vacuum seal mylar bags and panic when the bag doesn’t shrink. That panic is based on a misunderstanding, which we’ll settle in the verification section. And wider is better. Consumer vacuum sealers melt a strip only about 2 mm wide. A clothes iron can produce a flat, even seal 12 mm or wider. For long-term storage, the width and flatness of the melted band matter far more than the tool’s price tag.
The National Center for Home Food Preservation — the research body behind most home food storage safety advice in the US — is blunt on the storage side: thoroughly dried foods keep longest in airtight containers kept away from moisture, light, and temperature swings (NCHFP). Everything below is about meeting that airtight standard with equipment you already own.
What You Need Before You Seal a Single Bag
Before you heat anything, three choices determine whether your effort survives the decade: the bag, the absorber, and the tool. Each has a pass line.
Choosing Bags That Are Actually Sealable
Thickness first. For household quantities, 3.5 mil bags are the everyday standard, 5 mil handles heavy or bulky contents, and 7 mil is the heavy-duty option for long-term storage and sharp-edged food. Thicker bags also seal at higher temperatures. More on that in a moment.
Then run two zero-cost authenticity checks, because translucent “aluminum” bags are a real problem:
- The light test. Hold the empty bag against a bright window. A bag with a real foil layer shows nothing through both walls. If you can make out the window frame through two layers of film, the foil layer is missing or nearly nonexistent, and the bag is decorative rather than protective.
- The tear test. Cut the bag and look at the cross-section. A continuous silver-gray metal layer between the plastic layers is what you’re paying for. No metal line, no barrier.
For small-portion packing, a simple flat pouch is all you need. You don’t need gusseted stand-up bags to store a pound of beans.
Sizing Oxygen Absorbers Before the Clock Runs Out
The oxygen absorber, not the seal, is the true preservation engine in long-term storage. It also has one brutal property: it starts dying the moment it meets air. That iron powder inside oxidizes fast. Squeeze a fresh packet in your hand and it turns warm within 10 to 15 seconds; leave one exposed and it is effectively spent within 15 to 30 minutes. You cannot revive one by baking it. Oxidation is a one-way chemical reaction.
So the workflow matters more than the number. Size your absorbers first, stage everything, and only tear open the absorber pack when every bag is filled and ready. Leftover absorbers go immediately into the smallest airtight jar you own, with the air space minimized.
Sizing by bag volume (community-standard figures from PackFreshUSA and wikiHow):
| Bag size | Oxygen absorber |
|---|---|
| 0.5 pint (240 mL) | 50 cc |
| 1 pint (470 mL) | 100 cc |
| 1 quart (950 mL) | 300 cc |
| 1 gallon (3.8 L) | 500 cc |
| 5 gallon (19 L) | 1,500 cc |
Err on the generous side: you can have too few absorbers, never too many. The table also assumes dense food. Low-density food like pasta can be half air, so double the absorber capacity for the same bag volume.
Picking a Sealing Tool You Already Own or Can Afford
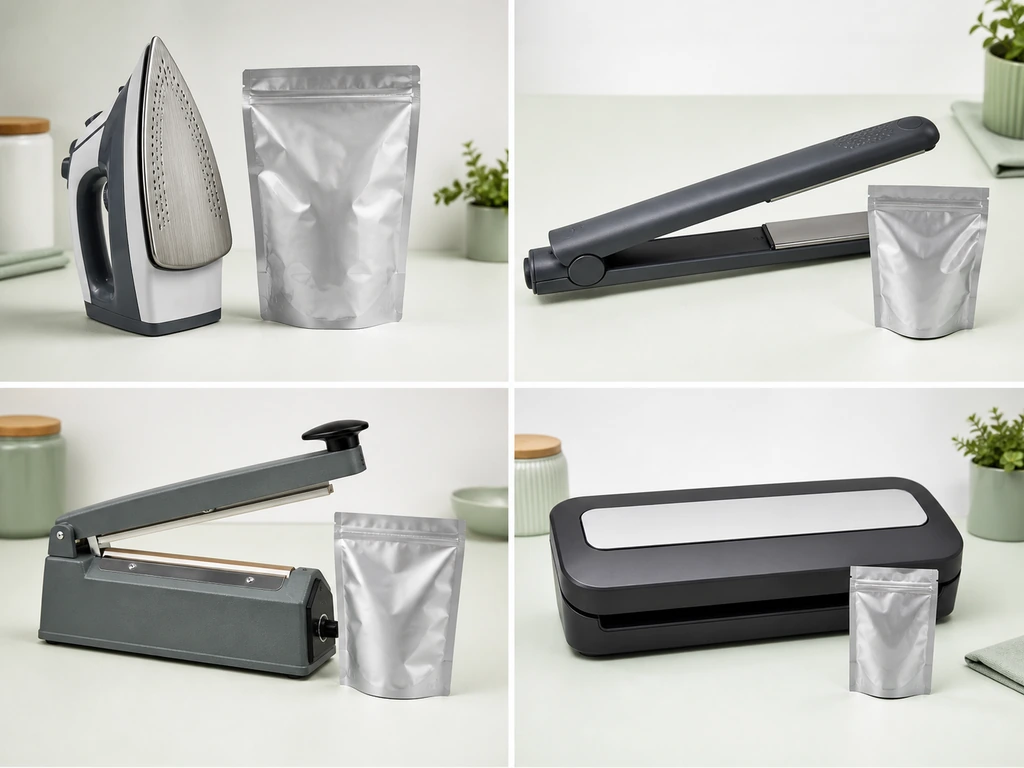
| Tool | Seal width | Best for | Watch out for |
|---|---|---|---|
| Clothes iron (cotton setting, dry) | Up to 12 mm+ | 5-gallon bags, bulk sessions | Temperature is by dial, not degrees. Test on scrap first |
| Hair straightener (metal plates) | Narrow, needs overlap | Small bags, quick jobs | Ceramic plates heat unevenly; metal is better |
| Impulse sealer | ~2 mm per pass | Uniform, repeatable seals | Narrow seal. Always seal twice, 2–4 mm apart |
| FoodSaver-style vacuum sealer | ~2 mm | Smaller bags | Often seals before vacuuming, or never gets hot enough for mylar |
All four work. What changes between them is seal width and repeatability. The impulse sealer’s narrow band is exactly why the two-pass rule exists.
The Step-by-Step Sealing Routine
Here’s the uncomfortable truth from a decade of forum post-mortems: most failed seals were failed before the iron ever touched the bag. Prep errors like too little headspace, too much air, and absorbers left out too long kill more food than weak heat seals do.
Prep: Label, Fill, Headspace, Absorbers, Squeeze
Work in this order, every time:
- Label first. Write contents and date on the outside of the empty bag. A full bag is awkward to write on.
- Fill to about 70%. Leave at least 3 inches of headspace. More for bigger bags. Propping a 5-gallon bag inside a bucket keeps it upright while you fill.
- One food per bag. Different foods have different shelf lives; mixing them means the shortest-lived item sets the clock for the whole bag.
- Add the absorber last. Drop it in moments before sealing, not when you fill. Remember the 15-30 minute window.
- Squeeze out the air. Press the bag flat against the food before sealing. The absorber will handle what’s left; your job is not to leave it a bagful of work.
The Seal Itself: Heat, Pressure, and Two Passes
Temperature is the parameter most people get wrong, often in both directions. Thin film scorches at settings meant for thick film, and thick film under-seals at settings meant for thin film. Here’s the working map (MountainReady):
| Bag thickness | Seal temperature | Household tool setting |
|---|---|---|
| 3.5 mil | 320–338°F (160–170°C) | Iron: wool setting |
| 5 mil | ~350°F (~177°C) | Iron: between wool and cotton |
| 7 mil | 374–429°F (190–220°C) | Iron: cotton setting (~400°F) |
Then the technique, three points:
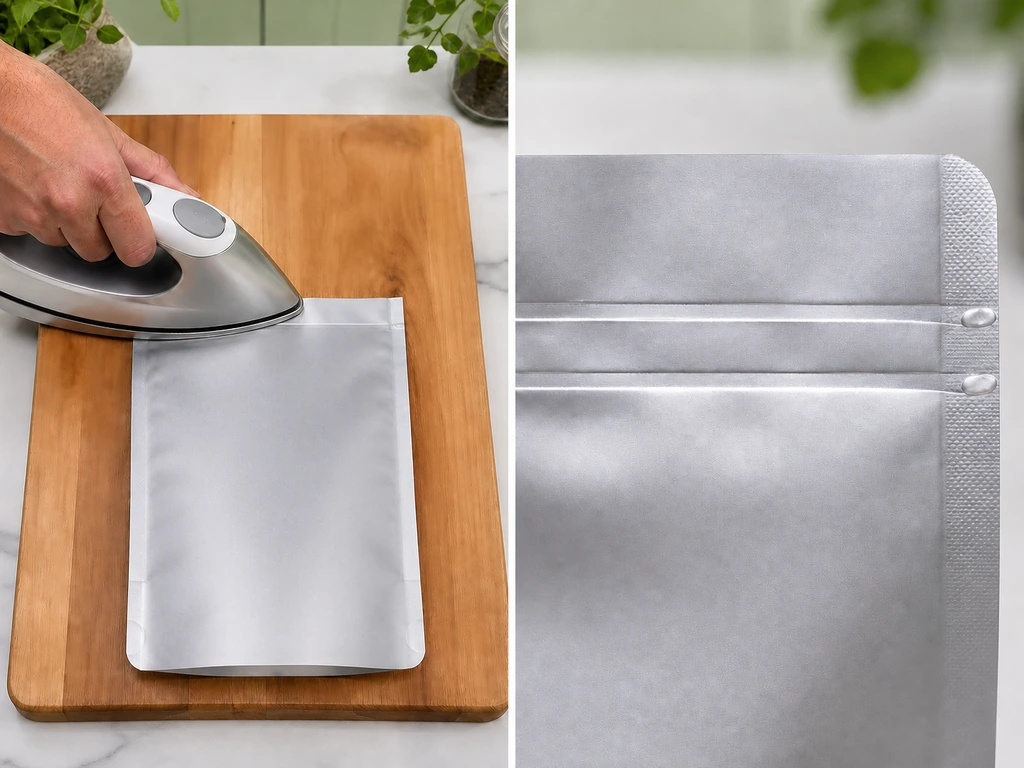
- Dry heat only. No steam: moisture trapped in the melt creates bubble channels through the seal.
- Support the seam. Lay the bag on a hard, flat surface. A wooden cutting board works; a padded ironing board doesn’t, because soft support lets the film wrinkle.
- One smooth pass. Slide the iron steadily from one edge to the other, taking 2 to 5 seconds. Don’t scrub back and forth; scrubbing folds the film.
And the discipline that separates good seals from lucky ones: seal twice. Let the first pass cool for about 10 seconds, then run a second pass 2-4 mm above the first. Testing puts the failure rate of a single seal around 8%; the double seal drops it to roughly 1%.
Sealed? Not quite done. The next section is where you find out whether you actually were.
What to Expect After the Seal: Storage Realities
Seal quality decides whether food lasts; food choice and environment decide how long “lasting” means. Store low-moisture, low-fat staples and the ceiling is decades; store the wrong food and no seal on earth saves it.
| Food | Realistic shelf life, sealed + oxygen absorber |
|---|---|
| Dried fruit, dried vegetables | 1–5 years (freeze-dried fruit: much longer) |
| Dry milk powder | 1–2 years (longer in nitrogen-packed cans) |
| Wheat, corn, white rice, dry pasta | Decades. UGA Extension lists them as storable indefinitely in proper containers |
| Dried beans | 10+ years |
| Sugar, salt | Indefinite |
| Brown rice, nuts, whole-wheat flour | 1–2 years maximum. The oils go rancid even without oxygen |
Two red lines behind the table. First, moisture: the University of Georgia’s long-term storage guidance calls for wheat at under 10% moisture, and the logic extends to everything you pack: above roughly 12%, you risk mold (UGA Extension, 2017). Second, the one people never expect: moist food plus an oxygen absorber is a botulism risk. Clostridium botulinum produces its toxin in exactly the conditions an absorber creates: a low-oxygen, low-acid, moist environment (NCHFP). Seal dry food, not damp food.
Environment completes the picture: a garage that swings 30 degrees between night and day cycles condensation through your bags, even sealed ones. UGA’s rule is simpler than you think: clean, dry, dark, and temperature-stable beats “cool but fluctuating” every time (UGA Extension, 2017). A basement corner at a steady 60°F is worth more than the coolest garage shelf.
How to Know Your Seal Will Last
Set your expectation now, because it prevents most false alarms: oxygen is only about 21% of air, so a working absorber can only ever collapse a bag by about one-fifth of its air space. A bag that doesn’t look vacuum-tight is usually fine. Here’s how to verify it is fine.
The 24-Hour Acceptance Check
Three observations, no instruments, in order:
- Run your finger along the seal. Any crease crossing the weld line is a potential leak path. If you feel one, add a third pass above it.
- Look at the seal’s ends. A tiny bead of melted PE at each end means the film reached melt temperature and fused. Zero bead anywhere suggests the iron ran too cold. Reseal. Heavy oozing means too hot: the weld is brittle. Reseal with a cooler setting.
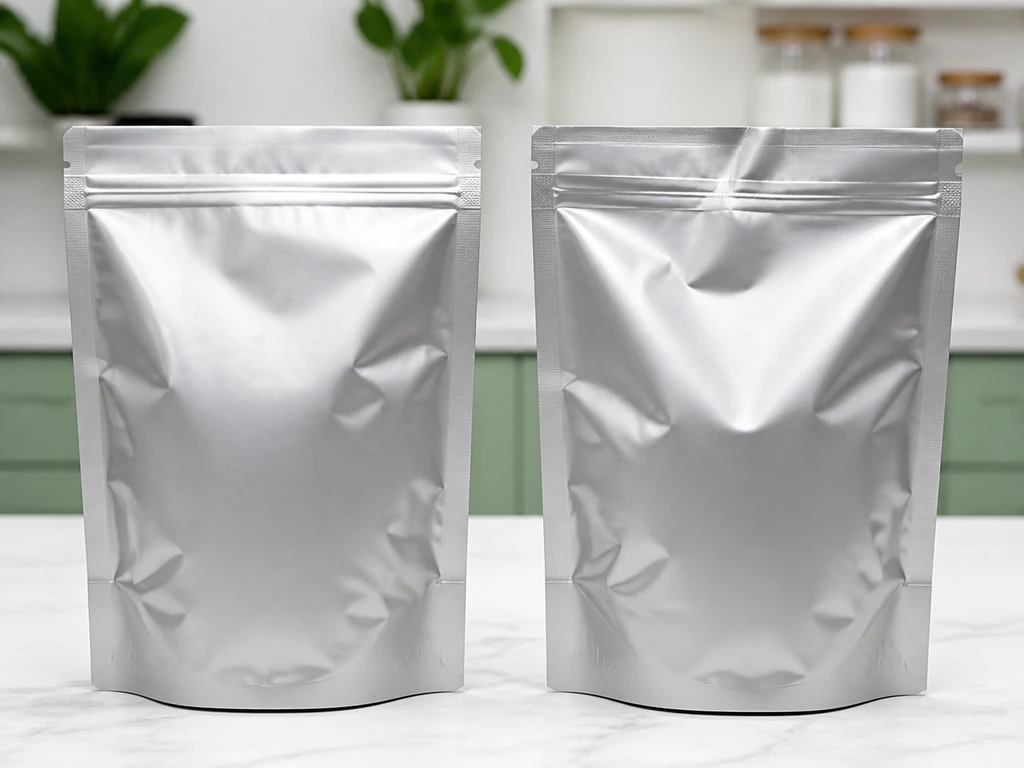
- Watch the seal area for 24 hours. The reliable signal is the film near the seal pulling tight against itself within a day. Don’t judge by the whole bag; judge by the seal zone. Powdered food like flour settles on its own and tells you nothing.
Optional but reassuring: lay a book on the sealed bag for 24-48 hours. A good seal holds; a weak one slowly balloons back.
When the Bag Won’t Shrink: A Four-Step Diagnosis
If a bag stays completely loose past 24 hours, run this chain. It costs nothing and avoids wasting good food:
- Is the absorber alive? Tear open a fresh packet and squeeze it for 10 seconds. It should warm up. If fresh ones stay cold, the whole batch is dead. Replace it. (No, you can’t dry them back to life.)
- Did you squeeze enough air out? Remember: even a perfect absorber only removes the oxygen, about one-fifth of the air. The rest stays forever. “Not fully shrunk” plus a tight seal zone equals a good bag.
- Does a crease cross the seal? Run the finger check from above. Found one? Re-seal above the original line. You don’t need to open the bag.
- Does the bag have a pinhole? Sharp food (rice, pasta, freeze-dried fruit) under vacuum is a puncture machine. If steps 1-3 came up clean, fill a suspect bag one-third with water and lift it. Leaks announce themselves. Punctured bags get redone, not patched.
Steps one through three are diagnosis; step four is blame. If nothing trips the chain and the seal zone is tight, the bag is good. Put it on the shelf and stop worrying.
From Pantry to Small Business: What Changes When You Seal at Volume
Step four of that diagnosis is where the stakes quietly change. A pinhole in a home pantry bag costs you a pound of rice. The same pinhole in a bag that ships to a customer costs you a refund, a review, and a repeat order. None of the checks above change. If you’re the growing slice of readers sealing bags to sell — freeze-dried candy, granola, roasted coffee — the technique you just learned stays the same. Its consequences scale up.
That shift reshapes three things. First, failure costs move from food to reputation. A home prepper finds a failed bag in year five and shrugs; a customer finds one in week two and posts about it. That’s why small food sellers are willing to pay real money for seal quality they can verify batch by batch. The acceptance check from the last section stops being optional and becomes a per-batch procedure. Second, the absorber clock forces a redesign. The 15-30 minute working window is irrelevant when you seal ten bags and becomes a production bottleneck when you seal two hundred. The fix is sequencing, not speed: fill every bag first, then open the absorber pack, then seal everything in one uninterrupted run. Third, “cheap bags” stop being a savings and become a liability. The forum distrust of unbranded translucent bags you met earlier doesn’t disappear when you buy at business volume. It intensifies, because your customers’ trust is riding on the same film. A supplier who can state the material structure of their bags — layer by layer, with the barrier specs — is the difference between packaging you trust and packaging you hope for.
The equipment question marks the boundary of this article. Up to a few thousand bags per batch, a quality impulse sealer with the two-pass habit you already know handles the work; continuous band sealers and form-fill-seal lines belong to a different scale of operation entirely. The business shape, though, is remarkably consistent: ready-to-ship small batches, ordered in the low thousands, decided by the owner directly, with the failure cost landing on the seller’s own brand. What that means for anyone supplying this market is equally consistent: low minimums for first orders, fast sampling so the owner can hold the bag in their hand, and pouches specified by content — a zippered stand-up pouch for retail shelf presence, a flat pouch for portion packs, with barrier layers matched to what’s inside. High-fat, high-aroma products like coffee and freeze-dried fruit need a stronger barrier structure than plain dry grains do, and the supplier who asks “what’s going in the bag?” before quoting is the one worth keeping.
If you’re sourcing that kind of bag for a small food business, the same logic applies in reverse: look for a manufacturer who can specify what’s inside the film. Baishen Pack, a China-based custom flexible packaging maker, produces custom mylar bags and high-barrier pouches built on multi-layer high-barrier structures that are moisture-, oxygen-, and puncture-resistant, using food-grade certified materials. Those are exactly the properties the checks in this article were designed to confirm.
References
- National Center for Home Food Preservation. “Botulism: Think Outside the Jar.” 2013. https://nchfp.uga.edu/blog/botulism-think-outside-the-jar
- National Center for Home Food Preservation. “Drying.” https://nchfp.uga.edu/
- Harrison, J. & Andress, E. University of Georgia Extension. “Preparing an Emergency Food Supply, Long Term Food Storage.” Reviewed 2017. https://www.fcs.uga.edu/extension/preparing-an-emergency-food-supply-long-term-food-storage
- PackFreshUSA. “Heat Sealing Mylar Bags.” 2017. https://packfreshusa.com/blog/heat-sealing-mylar-bags/
- MountainReady. “Common Mylar Bag Food Storage Mistakes That Ruin Your Emergency Supplies.” 2026. https://mountainready.online/blogs/news/common-mylar-bag-food-storage-mistakes-that-ruin-your-emergency-supplies
- wikiHow. “How to Seal Mylar Bags.” Updated 2024. https://www.wikihow.com/Seal-Mylar-Bags
- Baishen Flexible Packaging. https://www.bsflexpack.com/