
How to Design Candy Packaging Without Wasting Your Budget — The Complete Guide
Understanding What Your Candy Actually Needs From Packaging
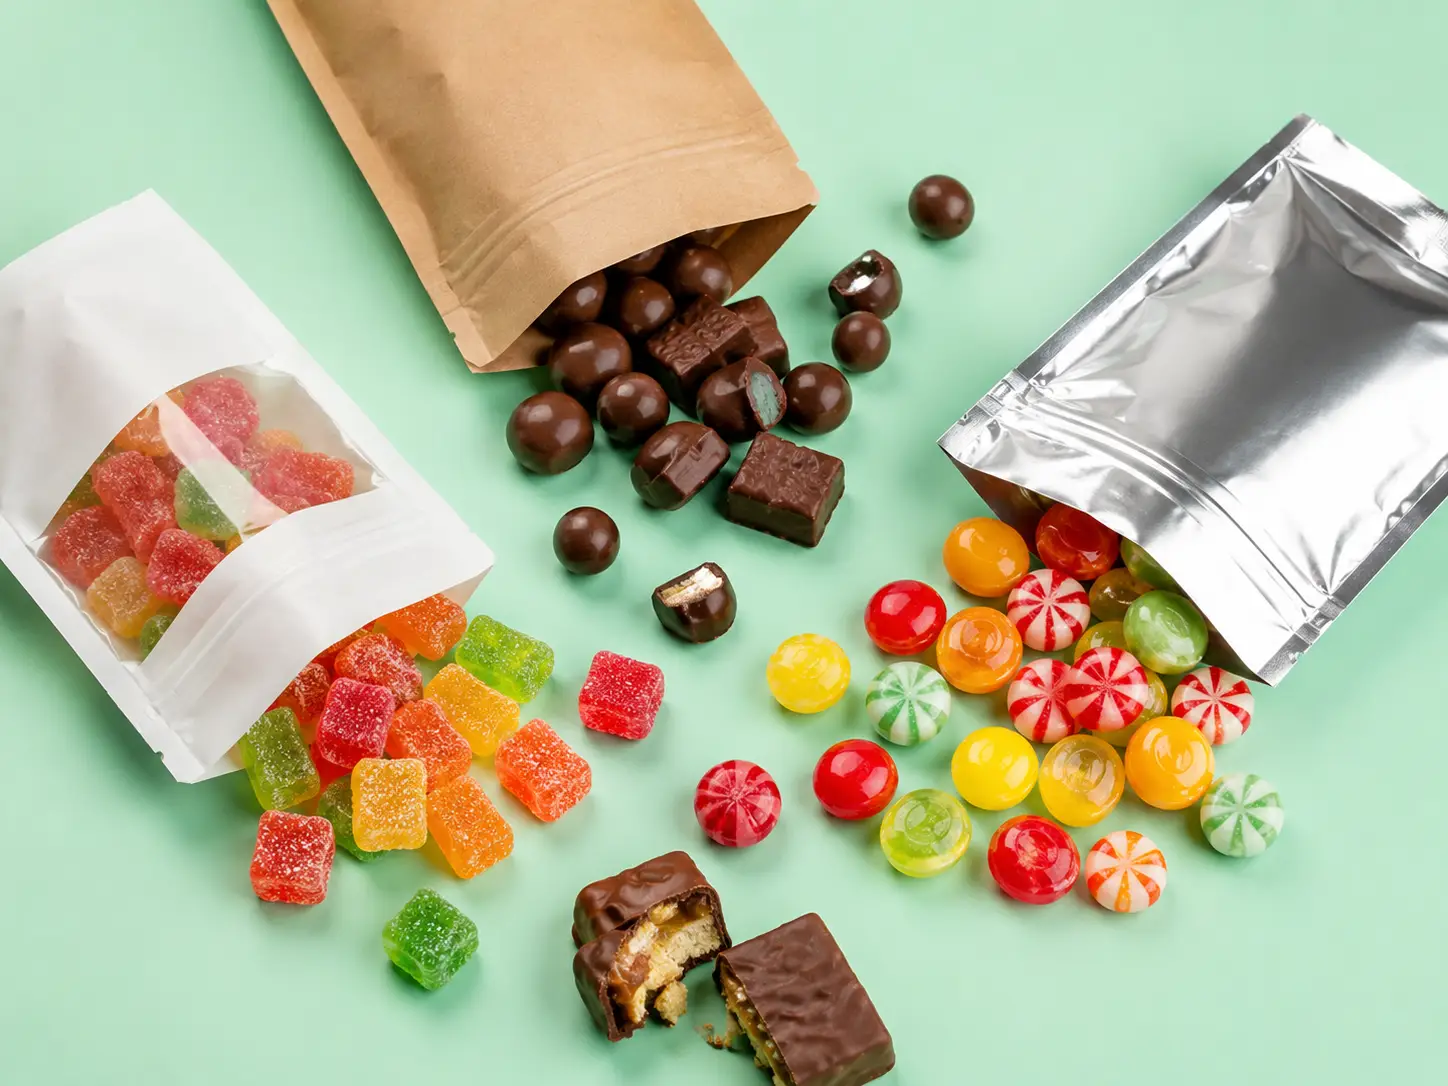
Picture a chocolate brand and a gummy candy brand walking into the same packaging factory. The chocolate maker needs a bag that blocks light, stops oxygen from turning the cocoa butter rancid, and prevents fat migration from smearing the print with greasy blooms. The gummy maker has the opposite problem: their product needs to keep its moisture so the candies don’t turn into hard little pebbles — while also not pulling humidity in from the air and turning into a sticky mess. Same factory. Same category called “flexible packaging.” Completely different technical requirements.
This is the gap most candy packaging design guides skip. They’ll show you beautiful award-winning pouches — and visual design matters, we’ll get to it — but the first question every candy brand should ask isn’t “What will my bag look like?” It’s “What is my candy actually afraid of?”
Start with three diagnostic questions. First, what threatens your product? Hard candies with a water activity (aW) below 0.3 are hygroscopic: they pull moisture from the air and turn sticky. You need a film with moisture vapor transmission rate (MVTR) below 1 gram per square meter per day. Chocolate, by contrast, fears oxygen and light. Oxygen triggers rancidity in cocoa butter, especially in nut-filled varieties. UV light accelerates fat bloom by destabilizing cocoa butter’s delicate Type VI crystal structure. Second, where will your candy be sold? A bar hanging on a convenience store peg faces different stresses than a sharing pouch standing on a supermarket shelf. Third, how do consumers eat it? Single-serve needs easy tear-open. Multi-serve needs a resealable zipper that still works on day three, not just on day one.
- What threatens your product? — Moisture, oxygen, light, or fat migration determines your film structure
- Where will your candy be sold? — Shelf, peg hook, or export route affects format and barrier needs
- How do consumers eat it? — Single-serve needs tear-open; multi-serve needs a reliable resealable zipper
If you can answer these three questions clearly, you’ve already done the hardest part of candy packaging design. The rest is execution. The next section walks through exactly which format fits which answer.
Choosing the Right Flexible Packaging Format for Your Candy
Before diving into specific formats, grab a notepad and answer three questions. First: does your customer finish the product in one sitting, or over multiple occasions? Second: how does your product get noticed on shelf — standing tall, hanging, or stacked flat? Third: what’s your realistic first production run — 500 units or 50,000? Your answers will point you naturally toward one of the formats below.
Stand-Up Pouches — The Workhorse of Candy Packaging
Walk down any candy aisle right now and stand-up pouches will outnumber every other format combined. The reasons are straightforward: they stand upright on shelves, they accept zippers and tear notches, and they work for everything from 100g sharing bags to 500g family packs.
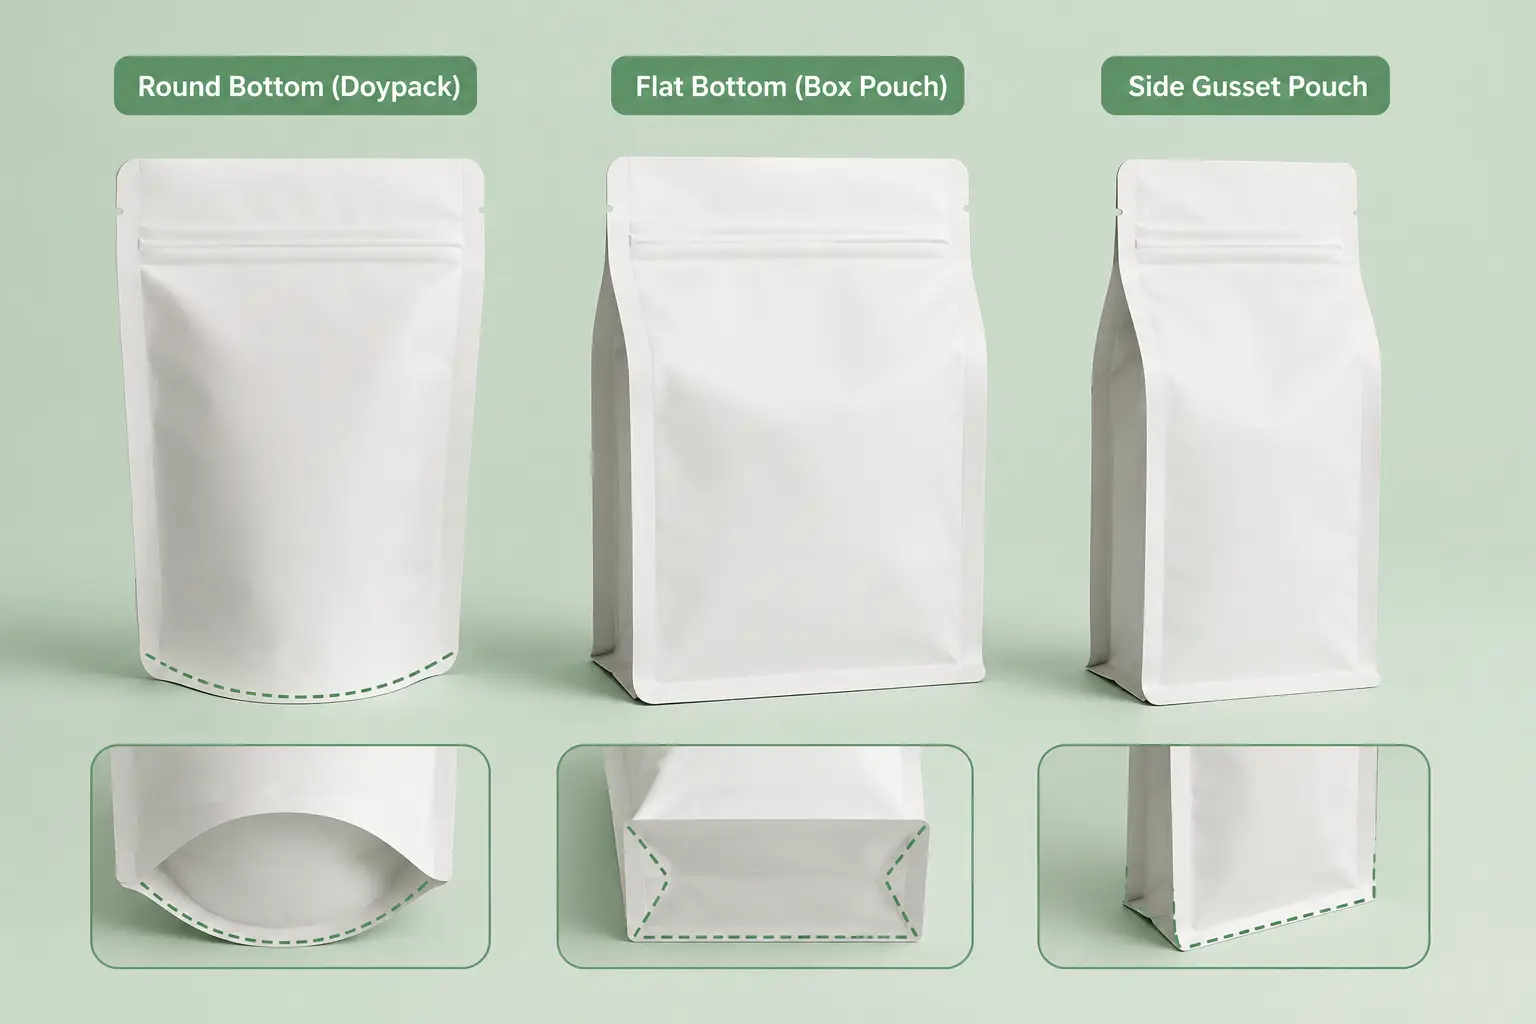
But “stand-up pouch” isn’t one thing. The bottom construction changes everything. Round-bottom (doypack) pouches offer the widest standing base and the most printable surface — ideal for hard candies and gummies where the product colors do half the visual work through a clear window. Flat-bottom (box pouch) designs maximize interior volume relative to exterior footprint. They’re the go-to for bulk sharing formats like M&M’s party-size bags. Side-gusset pouches have a squared-off, premium silhouette that signals “this isn’t a standard bag” — popular with craft chocolate and specialty toffee brands aiming for higher perceived value.
The closure choice interacts directly with how people eat your product. Press-to-close zippers are the affordable standard: they work, they’re familiar, and they add roughly ¥0.10–0.15 per bag. Slider zippers feel more premium and are genuinely easier for older consumers or anyone with reduced dexterity, but they’re heavier, pricier (¥0.20–0.30), and need specific bag-making machinery. For chocolate, there’s an additional constraint: heat sealing can de-temper the chocolate near the seal line. The fix is cold seal — a pressure-activated adhesive coating that bonds at room temperature. It’s standard in chocolate packaging, but not every factory offers it.
The transparent window deserves more thought than it usually gets. A full window shows off your candy’s actual colors and shapes — powerful for brightly colored gummies or distinctively shaped hard candies. A partial window leaves more room for branding and creates a “peek-a-boo” effect. The choice comes down to what’s more impressive: your candy’s appearance or your brand’s visual identity.
Flat Pouches & Flow Wrap — For Single-Serve and High-Speed Lines
Not every candy needs to stand up. If you’re making individually wrapped hard candies, stick-pack powdered sugar, or single-serve chocolate bars, flat pouches and flow wrap are your format — and they come with one huge advantage: speed.
Flat pouches come in three sealing configurations. Three-side seal is the simplest: one folded edge, three heat-sealed edges. The default for single-serve sachets. Four-side seal gives you more design flexibility with no fold line and better barrier uniformity. Center-seal (pillow pack) is the format on virtually every flow-wrapped candy bar — a single longitudinal seal running down the back, transverse seals at both ends.
Flow wrap runs on horizontal form-fill-seal (HFFS) machines that process 100 to 800 pieces per minute. The film unwinds from a roll, wraps around the product, and seals in one continuous motion. For chocolate bars, this is almost always cold-seal film — the adhesive coating bonds under pressure alone (2–5 bar), no heat, so the chocolate never risks de-tempering. Cold-seal lines can hit 150 meters per minute. Hot-seal lines for hard candies and pressed tablets run at 30–80 m/min, slower due to the dwell time needed for the seal bar to transfer heat.
The trade-off is flexibility. Flow wrap locks you into a specific bar dimension. Change your candy’s shape and you’re changing — or at least adjusting — your packaging line. Stand-up pouches are format-flexible: the same bag-maker switches between sizes with a tooling change. If you’re launching with one core product, flow wrap’s speed advantage wins. If you’re planning a product line with multiple shapes, stand-up pouches give you room to grow.
Kraft Paper & Eco-Forward Formats — The Sustainability Play
If you’re selling into European or North American retail, the sustainability conversation isn’t optional anymore. The EU’s Packaging and Packaging Waste Regulation (PPWR) mandates that all consumer packaging be recyclable by 2030. Retailer specifications from Tesco, Carrefour, and others are already tightening ahead of the regulation. For candy brands, this means understanding three distinct environmental paths, each with real trade-offs.
Recyclable mono-material structures replace traditional multi-layer laminates (PET/aluminum/PE) with single-polymer constructions — mono-PE or mono-PP with thin EVOH or aluminum-oxide barrier coatings. These can enter standard curbside recycling streams. The CEFLEX design guidelines explicitly recommend PE and PP mono-web structures. The catch: current mono-material barrier performance still trails traditional aluminum foil laminates, especially on oxygen transmission. They’re excellent for short-to-medium shelf life (6–9 months) at ambient temperatures. But candy headed for hot, humid export markets may still need traditional multi-layer films.
Compostable bio-based films (certified to EN 13432) are advancing fast. Cellulose-based films from companies like Parkside now break down in home compost within roughly 26 weeks. They’re viable for candy with 6–9 month shelf-life targets. Expect a 15–40% cost premium over conventional films, and verify MVTR and OTR numbers for your specific candy type before committing.
Kraft paper pouches occupy an interesting middle ground. The outer kraft layer gives you the natural, eco-conscious look consumers increasingly expect. The inner layer is almost always a high-barrier plastic film doing the real protective work. This isn’t dishonest — it’s functional. The kraft exterior signals sustainability at the point of sale. The barrier interior keeps the product safe. The key is honesty: don’t claim “100% paper” when there’s a PE liner inside. Frame it as “paper-based with a protective inner layer” and consumers understand the trade-off.
Barrier Materials — Matching Film Structure to Your Candy’s Vulnerabilities
Here’s a sentence worth taping to your monitor: match your film to your product’s actual vulnerabilities, not to the highest available spec. Every extra layer in a laminate adds cost. If a two-layer structure protects your candy adequately, a supplier pushing a five-layer composite is either padding their margin or doesn’t know your product well enough to right-size the spec.
The table below maps seven common candy types to their primary threats and optimal film structures. Use it as a conversation starter with suppliers — not as a final answer. Your target market’s climate, shipping route, and expected shelf life all influence the final choice. A good supplier runs shelf-life simulation testing before locking in your structure.
| Candy Type | Primary Threat | Recommended Film Structure | Key Performance Target | Typical Shelf Life |
|---|---|---|---|---|
| Hard candy (fruit drops, mints) | Moisture → stickiness | BOPP/PVDC or PET/VMPET/PE | MVTR < 1 g/m²/day | 12–18 months |
| Plain chocolate | Light + fat migration → bloom | Aluminum foil/PE or opaque VMPET/PE | OTR < 1, full light block | 12–24 months |
| Filled chocolate (nuts, cream) | Oxygen → rancidity + fat migration | PET/AL/PE or EVOH coextrusion | OTR < 0.5, MVTR < 1 | 9–12 months |
| Gummies & jellies | Two-way moisture migration → hardening or stickiness | PET/VMPET/PE or PET/EVOH/PE | MVTR 1–3, moderate O₂ barrier | 9–12 months |
| Nougat & toffee | Moisture → loss of chew | PET/AL/PE or high-barrier metallized film | MVTR < 1 | 6–12 months |
| Powdered candy (sour coating) | Moisture → caking | PET/VMPET/PE or pure aluminum foil laminate | MVTR < 0.5, puncture resistant | 12–18 months |
| Nut brittle & sesame candy | Oxygen + oil oxidation | PET/AL/PE or SiOx-coated barrier film | OTR < 1, MVTR < 1 | 6–12 months |
One technical detail that catches first-time buyers off guard: EVOH is an exceptional oxygen barrier — until it gets wet. Above 80% relative humidity, EVOH’s oxygen transmission rate can spike 10 to 50 times higher than its dry-condition rating. That’s why EVOH is always buried between hydrophobic layers like PE or PP in any properly designed laminate. If a supplier shows you a structure with EVOH sitting on the outside or inside, ask why. It’s a red flag.
Use the table above as a starting framework. The only way to be certain is to test. Request actual OTR and MVTR data at the temperature and humidity your product will face in its toughest distribution scenario — typically 38°C and 90% relative humidity for accelerated shelf-life simulation (Wipak, 2025).
How Your Design Choices Shape Production Cost — A Reality Check
No design inspiration blog will tell you this: every visual decision you make in Photoshop or Canva has a price tag waiting at the factory. The good news is that knowing which levers move cost the most lets you make smart trade-offs — getting 90% of the visual impact for 60% of the budget. Here are the three biggest cost drivers, in order of financial punch.
Print Method — The Single Biggest Cost Lever
Your order volume determines your printing technology. Get this alignment wrong and you’re either overpaying badly or locked into a process that can’t scale with you.
Rotogravure is the traditional workhorse. It etches your design onto metal cylinders — one per color. An eight-color design means eight cylinders at ¥800–3,000 each. Before a single bag rolls off the line, you’re ¥6,400–24,000 deep in tooling. The per-unit cost drops sharply at volume, making gravure the cheapest option above roughly 50,000 units. But for a startup launching five candy flavors with different packaging per SKU? That’s 5 × 8 cylinders = 40 cylinders. At ¥1,500 average, you’re at ¥60,000 in plates before production starts.
Flexographic printing uses polymer plates instead of metal cylinders. Cheaper per plate (¥500–1,500) but with slightly lower print fidelity, especially on fine gradients and photos. It sits in the middle: lower startup cost than gravure, lower per-unit cost than digital at medium volumes (10,000–50,000 units).
Digital printing eliminates plates entirely. HP Indigo presses print directly from digital files, matching roughly 97% of the Pantone color gamut, with zero tooling cost and no minimum order. Ten colors cost the same as three. Thirty SKUs with different artwork? No extra setup. This changes the math completely for multi-SKU candy brands and seasonal launches — you stop paying a “variety tax” on packaging.
| Print Method | Startup Cost (8-color design) | Best Volume Range | Color Cost Scaling | Lead Time |
|---|---|---|---|---|
| Rotogravure | ¥6,400–24,000 | 50,000+ units | Each color adds ¥800–3,000 | 3–4 weeks (including plate-making) |
| Flexographic | ¥4,000–12,000 | 10,000–50,000 units | Each color adds ¥500–1,500 | 2–3 weeks (including plate-making) |
| Digital | ¥0 | 500–10,000 units | No incremental cost per color | 7–10 days |
A real example makes this concrete. Say you’re launching five fruit-flavored hard candy SKUs — strawberry, lemon, blueberry, apple, grape — with 1,000 bags each for market testing. Gravure: 40 plates × ¥1,500 = ¥60,000 before a single bag. Digital: ¥0 in plates, all five designs go straight to press, everything ships in about a week. The digital route doesn’t just save money — it de-risks the launch. If blueberry flops, you haven’t sunk a single plate’s cost into it.
For brands in exactly this position — multiple SKUs, test-batch volumes, or seasonal rotations — a digital-first flexible packaging manufacturer removes the plate-cost barrier entirely. With HP Indigo 20000 and 25000 presses hitting 97% Pantone matching, zero tooling fees, order minimums as low as 500 pieces, and 7–10 business day turnaround, the production model built for large-volume rotogravure customers now works for startups and niche brands too. See how this approach has helped similar brands manage multi-SKU launches in these packaging case studies, or explore the technical details of digital printing for flexible packaging.
Material Layers — When “Premium Feel” Costs Real Money
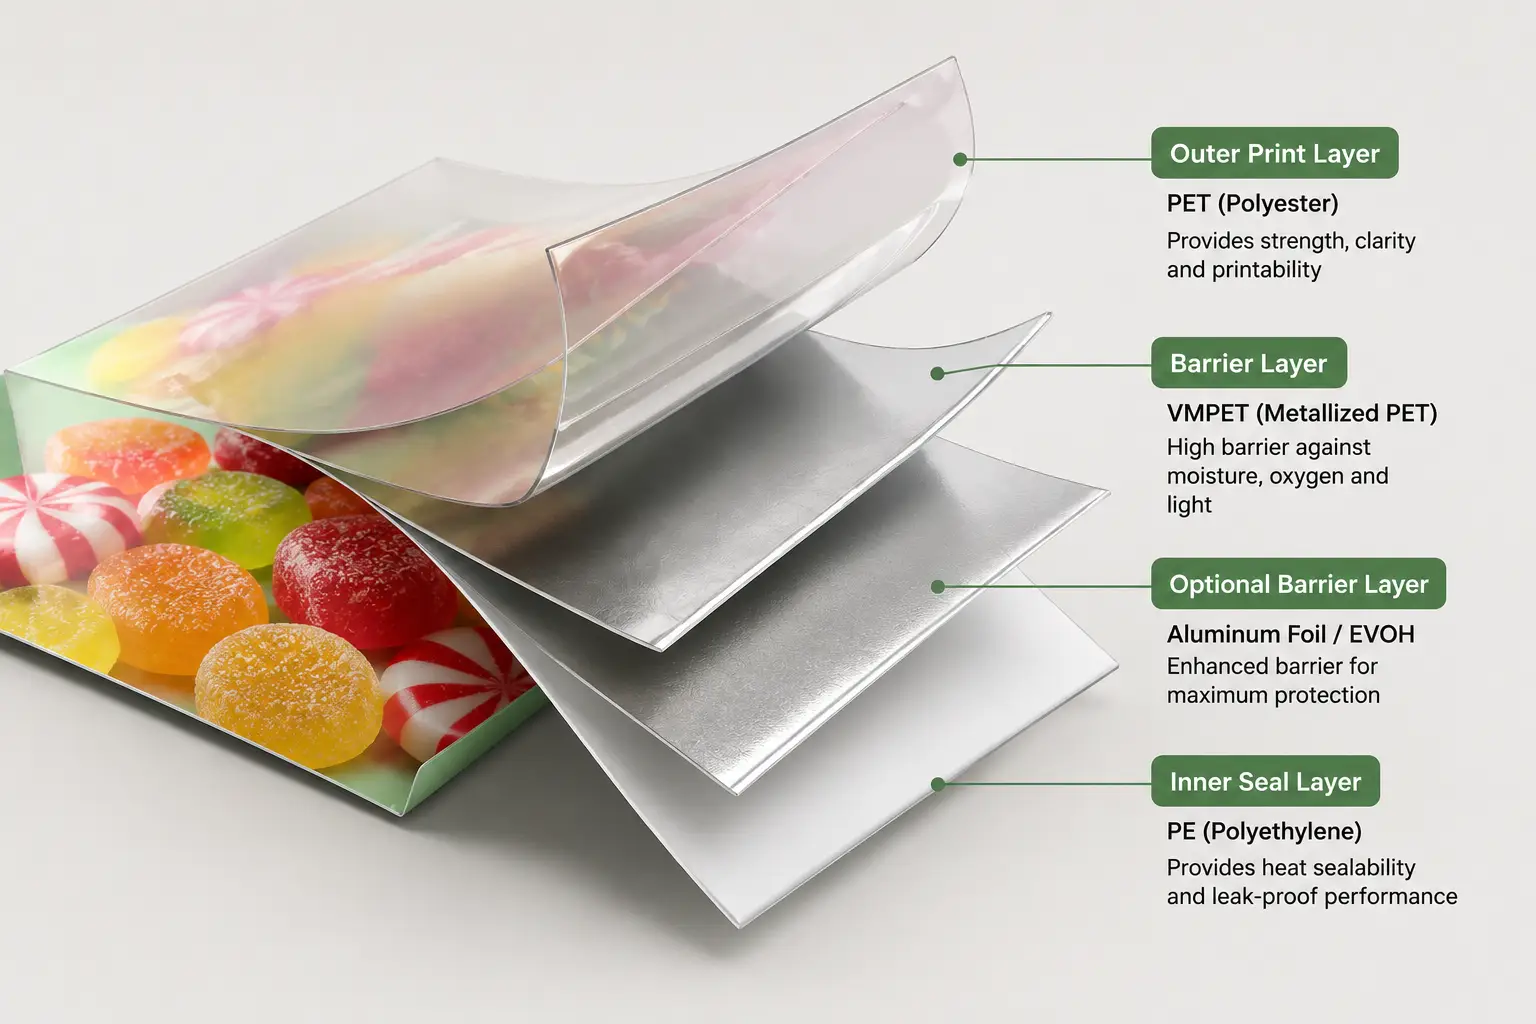
The bag in your hand is almost never a single sheet of plastic. It’s a laminate — multiple ultra-thin layers bonded together, each with a specific job. Learn to read this structure and you instantly sound like an informed buyer when talking to suppliers.
A basic two-layer build — PET for the print surface outside, PE for heat-sealing inside — costs roughly ¥0.30–0.50 per bag at typical candy-pack sizes. Add a metallized barrier layer in the middle (VMPET) and you’re at ¥0.50–0.80. Go to a four-layer structure with aluminum foil and nylon for puncture resistance, and you’re looking at ¥0.80–1.50. Each layer adds both material cost and lamination cost.
The three common barrier layers span a wide performance-to-price range. Aluminum foil (7–9 microns) gives near-zero permeability — the gold standard for chocolate and oxygen-sensitive products — but it’s opaque (no windows) and can’t enter standard recycling streams. Metallized PET (VMPET) deposits a micron-thin aluminum layer onto clear PET. You get partial transparency and good — not perfect — barrier at lower cost and weight than foil. EVOH is a transparent oxygen barrier, just 3–5 microns thick, sandwiched between PE layers. But remember the humidity sensitivity from the Barrier Materials section.
Thickness is the cost driver nobody discusses. Moving from 80 microns total to 100 microns adds roughly 5–8% to your material cost. The “premium hand-feel” difference is real but nonlinear: 80 to 100 microns feels noticeably more substantial. 120 to 150 microns? Barely perceptible. If your bag feels thick and luxurious, odds are the PE sealing layer went from 50 to 80 microns — adding about ¥0.06 per bag. On a ¥3 retail candy, that’s 2% of your revenue disappearing into plastic the consumer never consciously notices. Next time you handle a sample, ask: “What’s the PE layer thickness?” You’ll sound like someone who deserves honest answers.
Surface Finishes & Add-Ons — The Small Details That Add Up
Think of surface finishes like makeup. Matte is foundation — a silent upgrade that makes everything look more expensive, adding roughly ¥0.02–0.05 per bag. Soft-touch coating is a sensory statement: your bag feels like velvet, adding ¥0.08–0.15. Spot UV is lipstick — one high-gloss accent on your logo or a key visual element, ¥0.08–0.20, wildly effective when used sparingly. Holographic/metallized finishes are the full-glam evening look — ¥0.05–0.15 extra, dominant on-shelf, easy to overdo.
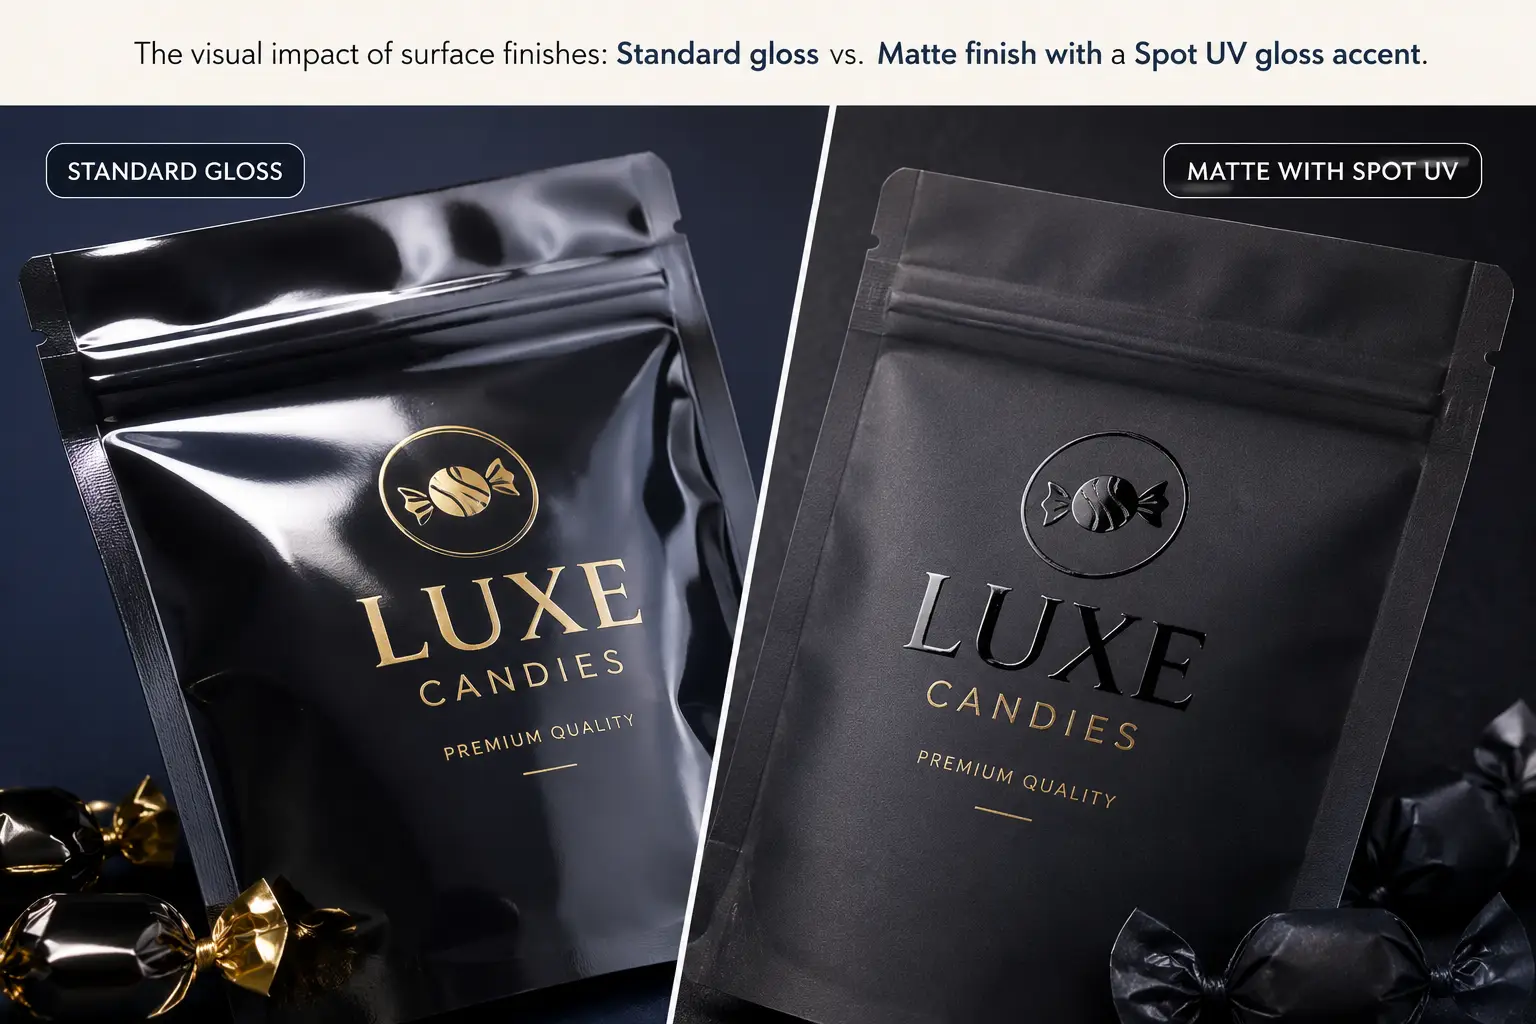
The winning strategy for budget-conscious brands: matte base + one accent finish on your logo. That gets you 80% of the premium feel for a fraction of the “everything shiny” approach.
Functional add-ons stack up fast. A press-to-close zipper adds ¥0.08–0.20. A tear notch costs pennies. A hang hole is essentially free — laser-punched during bag-making. Rounded corners, however, need a dedicated die: ¥200–500 tooling plus slightly slower production. None of these are bad choices. The key is knowing which ones your customer actually values versus which ones you’re adding because “premium brands have them.”
From Digital Proof to Delivery — What a Smooth Production Run Looks Like
You’ve chosen your format, selected your film structure, and finalized your artwork. Now the clock starts. Here’s what a well-run production timeline actually looks like — and where the common traps lie.
Day 1–2: Digital proofing. Your design file lands with the factory’s pre-press team. Within 24–48 hours, you get a digital proof. This is where most first-time buyers trip: they approve based on the screen. Don’t. Digital proofs capture roughly 85–90% of final printed color accuracy. The missing 10–15% is the gap between the RGB light your monitor emits and the CMYK inks the press lays down. The only way to confirm color is a physical press proof — running a small batch (200–500 bags) on the actual production machine. For brands with tight color standards, skip this step at your peril.
Day 3–10: Production (digital printing). With digital print, once you sign off, files go straight to the HP Indigo press. Printing, laminating, slitting, and bag-making run in sequence — the whole process finishes in 7–10 business days. For conventional rotogravure, add two to three weeks for cylinder engraving before printing even starts, bringing the total to 23–25 working days.
During production: quality control. A competent factory runs at least six tests per batch: interlayer adhesion, puncture resistance, tensile strength, burst strength, drop testing, and full visual inspection. You should get a QC report with these results. If your supplier doesn’t proactively send one, ask. If they can’t produce it, treat that as a warning sign.
Shipping. Flexible packaging ships by volume, not weight. Those oversized stand-up pouches that looked great in the mockup? They cost disproportionately more to freight because empty bags occupy nearly as much container space as filled ones. Factor dimensional weight into your format decisions early.
Receiving. Store printed flexible packaging cool and dry — ideally 20–25°C and below 60% relative humidity. Excessive heat can soften PE layers and cause blocking (bags sticking together). High humidity degrades paper-based exteriors. Keep them in original shipping cartons until use, away from direct sunlight.
Getting from concept to delivered packaging takes roughly two to four weeks with a digital-first supplier — and two to three months with traditional rotogravure. The speed difference isn’t just about patience. For seasonal candy launches, Valentine’s Day promotions, or test-market pilots, the shorter timeline means the difference between hitting your window and missing it. If you’re ready to explore what a production timeline looks like for your specific project, reach out for a free sample and personalized quote at Baishen Pack — a digital-first flexible packaging manufacturer that delivers custom candy packaging in 7–10 business days with free pre-production samples and responsive support that answers inquiries within 8 hours.
References
- Wipak. “Sweets & Confectionery — Packaging Solutions.” 2025. https://wipak.com/food-packaging/sweets-confectionery/
- CEFLEX. “Designing for a Circular Economy — Flexible Packaging Guidelines.” https://ceflex.eu/
- European Commission. “Packaging and Packaging Waste Regulation (PPWR) — 2025/40.” https://environment.ec.europa.eu/topics/waste-and-recycling/packaging-waste_en
- Baishen Pack. “Why Digital Printing for Flexible Packaging.” https://www.bsflexpack.com/capabilities/why-digital-printing/
- Baishen Pack. “Flexible Packaging Case Studies.” https://www.bsflexpack.com/case-study/
- Baishen Pack. “Contact — Get a Free Quote.” https://www.bsflexpack.com/contact/
- Baishen Pack — Custom Flexible Packaging Manufacturer. https://www.bsflexpack.com/